
Ever seen one of the stunning Barn Doors on Pinterest or online and thought, “I really wish I could make one of those!”? Well, today we are teaming up with HART Tools once again to show you how to do it! Best part? We are doing it with only a few basic tools that almost anyone will have in their garage. Keep reading on to find out how to make your own barn door, in DIY Barn Door with HART Tools.
Disclosure- This article was written in partnership with HART Tools. I have been compensated for my time, however, all opinions are my own.
About this project-
DIY Barn Door with HART Tools

One of the great things, when you start to expand your skills in building, is that you can start to take on projects you haven’t tackled before and make them your own. For me, I was eager to share with you guys how to take a dream project and make it a reality! Since some of you may be new to DIYing, I picked something that is new to making for me, too! So, my first attempt at a Barn Door- let’s go!
Tools Needed
DIY Barn Door with HART Tools
Carpenters Square
Narrow Crown Stapler
Clamps
Supplies needed
Hollow Core Door
Bender Board
Hardware- I bought mine here!
Handle
Bottom Track
Wood Glue
Paint
Wood filler or spackling
Putty Knife
Let’s get started!
DIY Barn Door with HART Tools
 Measure your existing door, try and either get that exact size, or one slightly larger. The great part of using a hollow core door as the base is that we get to skip a lot of the prep and avoid a lot of the reasons most Barn Door projects fail. So- by starting here we have a smooth surface that is ready to go!
Now- it is fair to mention that most doors jambs will have some needed prep before you install a Barn Door- I think this is a great article on a DIY friendly method, but I can always write another article for you guys that details the process I followed!

I spent some time with my MDF bender board to layout the design. The great thing about this product is you save some time crosscutting these prefabricated pieces vs. buying sheet goods and it is super inexpensive to purchase. Plus, it paints really well!
I drew several ideas in advance for this Barn Door and then changed it quite a bit once I had it in the shop, so this step is important for you. You can follow my design or alter it a bit to suit your tastes!

Once your design is solid, you’re ready to start cutting the bender board. I used my HART Miter Saw for this step, but you could also use a circular saw or jigsaw too. What’s great about the HART Miter Saw is that it’s a great Miter Saw to start with, as it has a wide range of features and will offer you a lot of versatility as you advance in your projects. No matter which tool you choose to use, always measure twice, and you’ll save yourself a ton of headaches.

First, I did a border around the door to give it some added dimension. These 4 pieces are all basic 90-degree angles. I cut the long sides first, applied glue, clamped them in place, and attached them using a crown stapler. If you don’t have clamps, you can easily use heavy objects or use painter’s tape to keep the boards in place while the glue dries. You could also use fine trim head screws to attach them too, or even small gauge nails and a hammer.

Measure across the top and bottom of the door and do the same process there, too. Make sure these pieces stay square, so you aren’t ending up with an odd space to design in.
Design is always a really fun element and one that is always a personal choice! I had a ton of ideas for this door, but I wanted to keep the angles simple so that it was beginner-friendly. I cut 16 total pieces of Bender Board, both ends at 45-degrees, measuring 19 5/8 inches corner to corner.

I laid out and dry fit the pieces prior to attaching these to the door. I always take this step to be sure I like where the design is going, and it allows me to make changes before the design is permanent. I ended up trimming them a little more at this stage to leave some extra space around the main design.

I attached these to the door following the same process as the borders, being extra diligent to maintain even borders. A lot of measuring and taking your time is the key to this step!
I went through and filled any small marks with filler from the fasteners and any areas where small seams were left. This is the key to getting a really good end finish and makes your design seamless.

Once the filled areas were dry, I took my HART 20V Random Orbit Sander to smooth these areas perfectly to be sure painting will be a breeze.
Painting the door is likely the toughest part- but here are a few tips! Regardless of how you apply your paint, whether rolling with a foam roller, spraying or brushing, you can’t go wrong.

TIP- I would recommend using a primer or using a paint product that has a primer included. Especially on anything MDF, I feel priming is key! Also, mix your paint really well- mixing attachments and a Drill work awesome!! That’s so often overlooked, but so important! Be sure to purchase a paint designed for doors or trim as they are designed to take abuse more than walls. I used our normal trim paint- Sherwin Williams Pro Classic in a Satin Finish- my shade is Snowbound.

The last detail on the door is the final trim work. This is an important step to me as you will have a door that looks much more custom with trim that pops more than a standard door edge. You have tons of options on how to add your border and could easily do this before painting, too, for a one-tone look. Since I wanted contrast on the door, I added some walnut I had on hand.
I cut the strips to length, mitering the edges to be extra clean. Miters can be tough but be sure to keep your Miter Saw tuned so it cuts them perfectly!

I sanded the walnut lightly using my HART 20V Random Orbit Sander, and prefinished with a clear coat prior to attaching them to the door. You can use any wood you have on hand or purchase simple pine and stain it too. I attached these pieces using wood glue and a few trim screws.
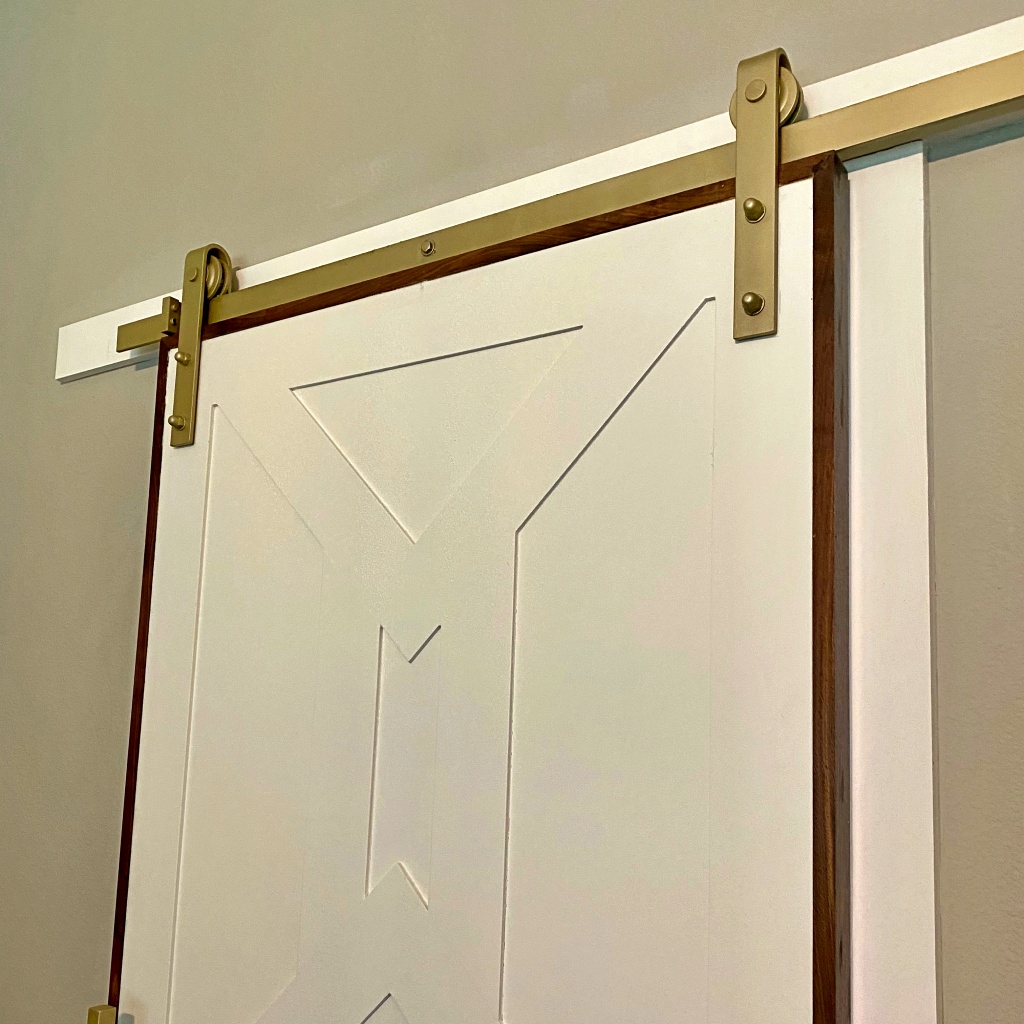
An extra step I took was painting my hardware (you can likely skip if you found hardware in a finish you love). I recently built nightstands with walnut tops and brushed brass hardware, so I knew I wanted that to coordinate. When I started searching for hardware for these doors, I was surprised at the drastic increase in pricing for finishes other than nickel or black. Rather than pay 3 or 4 times the cost for the finish alone, I opted to purchase black hardware and repaint it myself. This is easy, so it’s a no brainer for the cost of a can of spray paint. Don’t be afraid of steps like this, too. Hardware can make or break any piece so be sure to get what you want!

I installed the Hardware using My HART 20V Drill, and was ready to install the door! Follow manufacturer instructions for installing the Door track. I ran into a slight issue with how the hardware ended up fitting on the door, where I needed to attach them was partially on the trim portion. There are a ton of ways I could have corrected it, so it wasn’t a huge obstacle, but definitely keep the dimensions and where your hardware will fasten in mind when you design the door.
Wrap Up
DIY Barn Door with HART Tools
What a killer project, y’all! This was so fun to build and honestly was a quick and easy weekend project! There are so many ways you could take this build to the next level and add more detail if you wanted to with molding and additional layers. Plus, you can do everything from a herringbone or chevron pattern with the same method too, it really is a limitless build!
I added a lot of details to this post to cover all of the questions I had over on my Instagram, but feel free to ask more in the comments below!
Huge thank you to HART Tools for sponsoring this project and remember if you decide to build one yourself – #doitwithHART! HART Tools are available exclusively at Walmart, with a range of everything from classic power tools to a wide range of hand tools and outdoor power equipment. HART is a great brand to start with as you take on your weekend projects at home!
Love this! What width bender board did you use? Where did you get it? Thanks!